
Overview
Looking to build a grid layout in your app?
With your data stored in Realm, you can create an interface like this really quickly. Best of all too, changes to your data will trigger automatic animations!
This tutorial is going to show you how you can use RealmGridController, a specialized subclass of UICollectionViewController, to bind to your data in Realm.
Let’s get started, but if you want to jump to the end product, you can see the final code on GitHub here.
If you are looking for a Objective-C version, you can check out the tutorial for ABFRealmGridController, which has an identical API.
You can see the final code on GitHub here.
Tutorial
Create a new Xcode project, using the “Single View Application” template. Be sure “Language” is set to Swift, and that “Use Core Data” is unchecked.
RealmGridController is available through CocoaPods. (If you don’t have CocoaPods installed, follow their instructions before continuing.) In your terminal, cd to the project folder you just created, and open the Podfile (if you don’t have a podfile, perform pod init in the folder first). To install RealmGridController, simply add the following lines to the Podfile you just created:
use_frameworks!

pod 'RealmGridController'
For this tutorial, we will be using a few more pods, so add the following lines too:
# Pre-built data model for New York Times Top Stories API
pod 'RealmSwiftNYTStories'

# Image loading/caching library
pod 'HanekeSwift'

# Easy UIViewController to display website
pod 'TOWebViewController'
In your terminal, run pod install. This will also install Realm Swift automatically! (If this is your first time using CocoaPods, this could take a while. Future uses will be much faster.)
When it’s done, you’ll need to close the Xcode window and open the xcworkspace file that CocoaPods created, so that you can use the classes inside the pods.
Now that we have our base project setup, we need to first create a subclass of RealmGridController to allow us to customize its display.
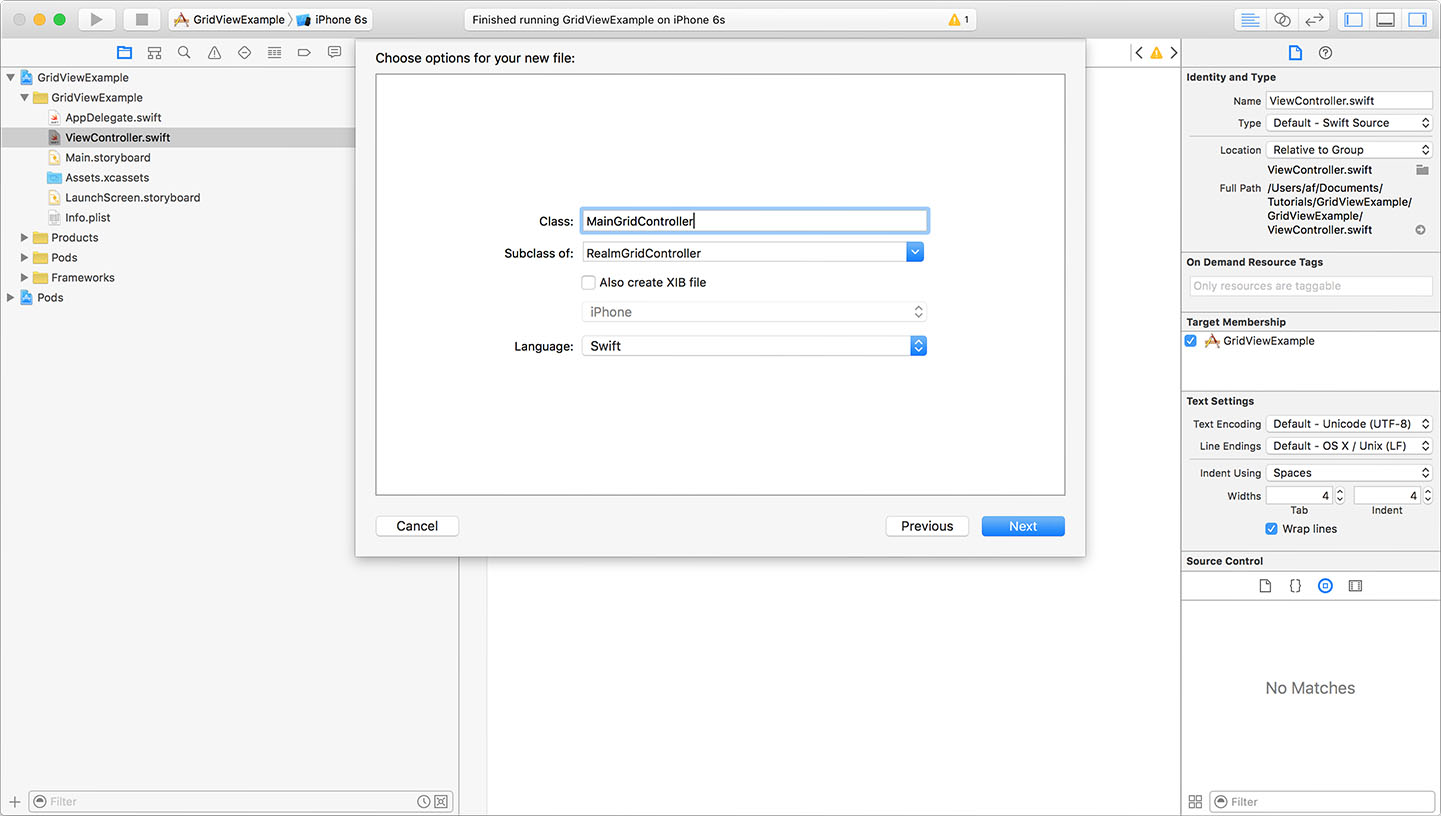
Go to File → New → File then click “Cocoa Touch Class”. In the resulting dialog, set the name to “MainGridController” and the subclass to UICollectionViewController (the grid controller is a subclass which we will update later). Be sure to leave the checkbox for Xib unchecked and the language as Swift.
With our subclass created, we now have to customize the Storyboard to utilize it. In Main.storyboard, delete the default ViewController scene. Then drag into the scene a UINavigationController and a UICollectionViewController. You will have to delete the UITableViewController the UINavigationController created and change the segue to point to the UICollectionViewController (control-click the Navigation Controller and drag the segue outlet to the UICollectionViewController).
With the UINavigationController and UICollectionViewController in place, make sure to then adjust the UICollectionViewController to have a custom class that is MainGridController and set the background color on the UICollectionView to white.
Then make sure the UINavigationController is listed as the initial view controller, or you won’t ever see anything! Here’s a video showing all of these steps:
Finally, we need to configure the navigation bar within our grid controller. Click the Navigation Item and set the title to “Top Stories.” Then drag a UIBarButtonItem to the right area of the navigation bar. Configure the bar button to be a refresh icon, then click the Assistant Editor button. Control-click the refresh bar button to create an action outlet in MainGridController; name the method didClickRefreshButton: and set the “Type” to UIBarButtonItem.
Tip: You can now delete the ViewController.swift file as we won’t need this anymore.
Now that we have the initial wiring setup, we need to get the data ready. The New York Times offers a great API, and we will use their “Top Stories” API to retrieve the latest news stories and display them in the grid.
Recall during the pod install we added RealmSwiftNYTStories. This pod includes two Realm model classes: NYTStory and NYTStoryImage. They represent the data return from the New York Times Top Stories API.
To simplify this tutorial, we won’t go into all of the steps on how to request data from the API and then deserialize the resulting JSON data into Realm objects. Instead, all you have to do is register for an API Key here:
Be sure to scroll all the way down and check the box for “Issue a new key for Top Stories API”!
Then simply add to the top of MainGridController.swift, including a few more so we have everything we need:
import RealmSwiftNYTStories
import RealmGridController
import RealmSwift
Now adjust MainGridController to be a subclass of RealmGridController instead of UICollectionViewController directly:
class MainGridController: RealmGridController
To load data from the New York Times, NYTStory class includes a convenience method, so insert this method in the IBAction method that is tied to the refresh bar button:
@IBAction func didClickRefreshButton(sender: UIBarButtonItem) {
    NYTStory.loadLatestStories(intoRealm: try! Realm(), withAPIKey: "INSERT_YOUR_API_KEY_HERE");
}
If you want to see how we handle the data request and JSON parsing, just check out the implementation of this method in NYTStory.swift. It performs several async API requests for each newspaper section and parses the JSON response into the Realm models.
Now that we have our data model ready, let’s get started in customizing the grid’s look. Since RealmGridController is just a specialized UICollectionView, we will need to create a UICollectionViewCell to display each news story.
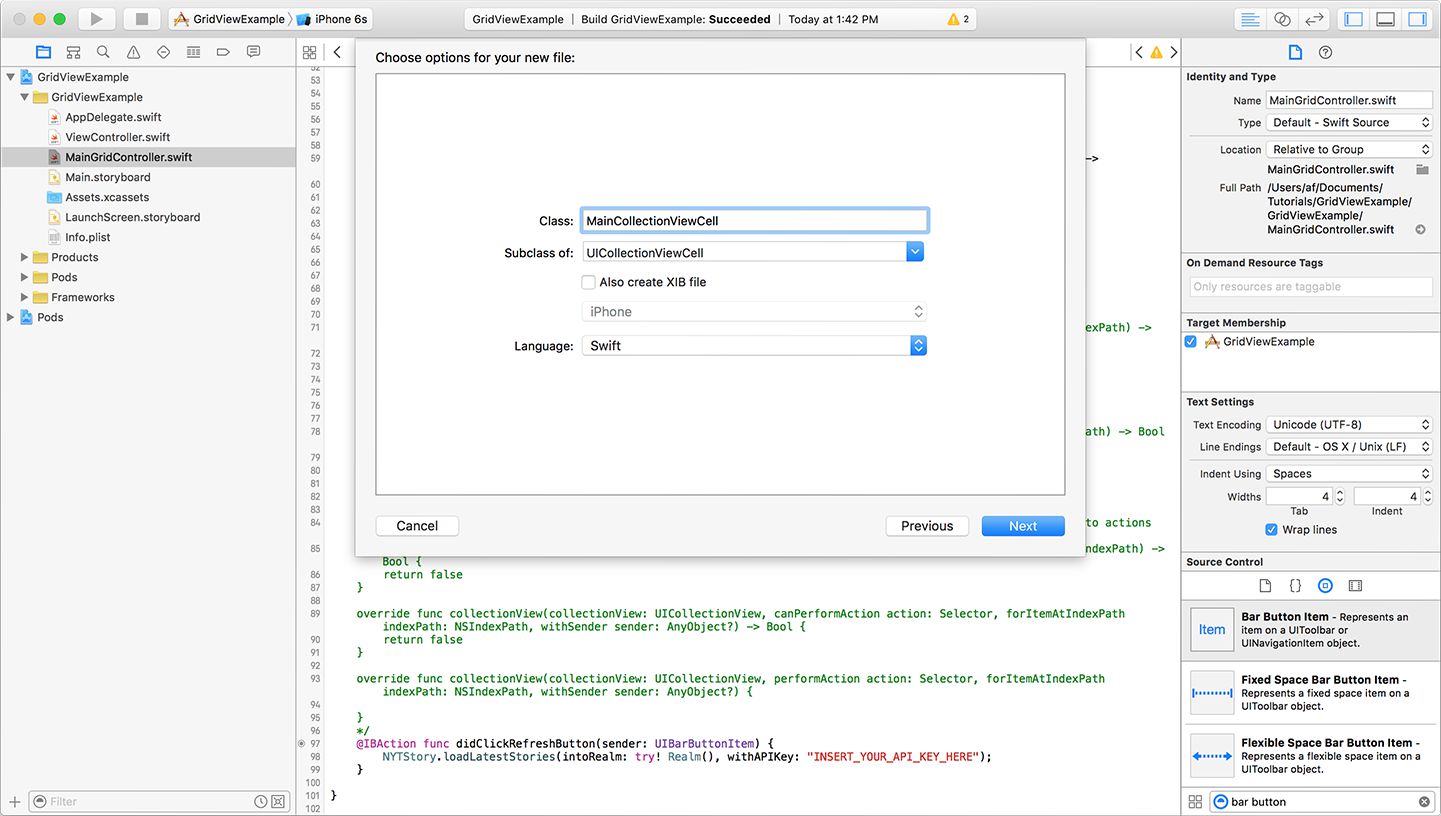
Go to File → New → File then click “Cocoa Touch Class”. In the resulting dialog, set the name to “MainCollectionViewCell” and the subclass to UICollectionViewCell. Be sure to leave the checkbox for Xib unchecked and the language as Swift.
For each news story, we want to show an image, the publishing date, title and a small excerpt. Add the following properties to the MainCollectionViewCell:
@IBOutlet var imageView: UIImageView!
@IBOutlet var dateLabel: UILabel!
@IBOutlet var titleLabel: UILabel!
@IBOutlet var excerptLabel: UILabel!
To layout the elements we will use Main.storyboard. Customize the UICollectionView, by making sure Items is equal to 1. Adjust the cell size to be 185 wide and 250 high. All the other sizes should be 0.
Now drag in a UIImageView and position it at the top.
Apply the following constraints:
| Constraint | Value |
|---|---|
| Horizontally in container | 0 |
| Top Space | 0 |
| Width | 75 |
| Height | 75 |
Here is a video showing how to setup the UIImageView:
Next, we’ll set up the three labels. There’s a video after this showing how to set them up.
First, drag a UILabel and position it below the UIImageView. This will be the title label. Set its font to System Medium 15, and center the text.
Apply the following constraints:
| Constraint | Value |
|---|---|
| Top Space | 4 |
| Leading Space | 0 |
| Trailing Space | 0 |
| Height | 21 |
Second, drag another UILabel below the title label. This will be the date label. Set its font to System 13 with a hex color of #8C8C8C, and center the text. (If you don’t see the hex color field, be sure you’re on the second tab in the color picker, and that “RGB Sliders” is selected.)
Apply the following constraints:
| Constraint | Value |
|---|---|
| Top Space | 4 |
| Leading Space | 0 |
| Trailing Space | 0 |
| Height | 21 |
Finally, drag the last UILabel for the excerpt below the date label. Set its font to System 13 with a hex color of #8C8C8C. Set the “Number of Lines” to 0, which will let the label use as many lines as it needs.
Apply the following constraints:
| Constraint | Value |
|---|---|
| Top Space | 8 |
| Leading Space | 0 |
| Trailing Space | 0 |
| Bottom Space (Priority Low) | 0 |
Since the label will be a different size based on the amount of text, we need to make sure the bottom constraint has a lower priority to allow it to adjust.
Here is a video showing all of the steps involved in settings up the cell’s labels, including the specific constraints:
Now that the cell is configured, set its custom class to MainCollectionViewCell and give it the identifier “mainCell”. (It’s important that you type this in exactly as it’s written here, or the app won’t work later.)
You will now need to connect the elements in the cell to the corresponding outlets in MainCollectionViewCell.swift. Open the Assistant Editor again, and control-click and drag from an element to the correct outlet. (If you don’t see MainCollectionViewCell.swift in the Assistant Editor, you’ll have to manually set it by clicking “Automatic” at the top of the pane, changing it to “Manual,” and navigating to MainCollectionViewCell.swift) You can see how in this video:
Almost done! We have our data model setup and a custom UICollectionViewCell to display the stories. The last part is to configure MainGridController.
In the template code for MainGridController.swift, set the reuseIdentifier to “mainCell”.
Then in the override of viewDidLoad() we need to tell the controller that we want to bind to the data model NYTStory.
Remove the line of code that is attempting to register a cell class; we have already set that up in the storyboard.
override func viewDidLoad() {
        super.viewDidLoad()

        // Set the Realm object class name that the grid controller will bind to
        self.entityName = "NYTStory"

}
TIP: You can also set this in Main.storyboard. Select the MainGridController, and the property will be in the right sidebar. This is possible due to the @IBInspectable annotations.
Next we want to sort the stories based on the published date, so set the sortDescriptors property:
override func viewDidLoad() {
        super.viewDidLoad()

        // Set the Realm object class name that the grid controller will bind to
        self.entityName = "NYTStory"

        self.sortDescriptors = [SortDescriptor(property: "publishedDate", ascending: false)]
}
Since RealmGridController is simply a specialized UICollectionViewController, we will need to implement a UICollectionViewDataSource method to configure the cells. Remove all the methods that were provided in the UICollectionViewController template except for:
override func collectionView(collectionView: UICollectionView, cellForItemAtIndexPath indexPath: NSIndexPath) -> UICollectionViewCell
To configure the cell add this code into the function:
override func collectionView(collectionView: UICollectionView, cellForItemAtIndexPath indexPath: NSIndexPath) -> UICollectionViewCell {
        let cell = collectionView.dequeueReusableCellWithReuseIdentifier(reuseIdentifier, forIndexPath: indexPath) as! MainCollectionViewCell

        // Configure the cell
        let aStory = self.objectAtIndexPath(NYTStory.self, indexPath: indexPath)

        cell.titleLabel.text = aStory?.title
        cell.excerptLabel.text = aStory?.abstract

        if let date = aStory?.publishedDate {
            cell.dateLabel.text = NYTStory.stringFromDate(date)
        }

        // Lazy load image using Haneke library
        if let imageURL = aStory?.storyImage?.url {
            cell.imageView.hnk_setImageFromURL(imageURL)
        }

        return cell
}
This method is where the UICollectionView requests the cell to display. We dequeue a cell with the identifier: “mainCell” (recall we set this in the Storyboard).
We can then use the controller’s method to retrieve the object at the given index path. With the story we can now set the various properties of the cell.
Note: NYTStory includes a class method to convert the date into a short string.
Finally, to handle displaying the image we are going to use a simple image caching library: Haneke. Recall we installed this during the initial pod install.
This library makes it really easy to fetch images from the web on a background thread and then cache them for quick access while scrolling.
All that is needed is to import the main header file:
import Haneke
and then this line in collectionView:cellForItemAtIndexPath will enable the caching:
cell.imageView.hnk_setImageFromURL(imageURL)
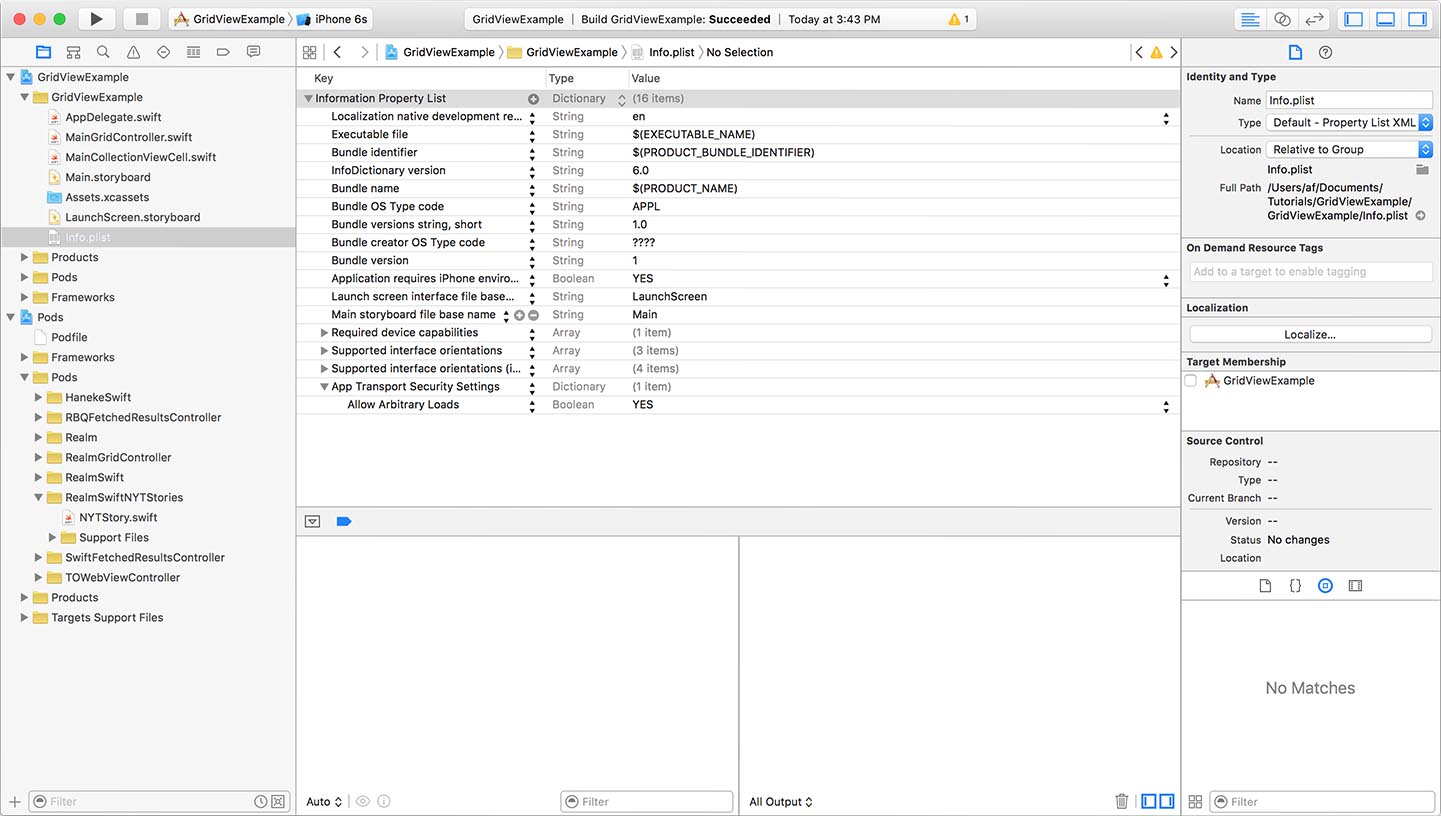
With the cell configured to display the data, there’s only one small step left before the app will work. Starting with iOS 9, we need to make an exception to the App Transport Security (ATS) settings so that the stories can load (by default, iOS 9 blocks all URL requests to non-secure websites).
Go to Info.plist and add the following entries (you can see the new entries on the last two lines):
Now let’s make the app a bit more interesting…
The first is to allow the user to click on the story and load it in a web view. Recall, we installed TOWebViewController during the initial pod install, so let’s import its header into MainGridController.swift
import TOWebViewController
This library makes it dead-simple to display a web view with a URL. We will need to implement a UICollectionViewDelegate method:
override func collectionView(collectionView: UICollectionView, didSelectItemAtIndexPath indexPath: NSIndexPath) {
        collectionView.deselectItemAtIndexPath(indexPath, animated: true)

        let story = self.objectAtIndexPath(NYTStory.self, indexPath: indexPath)

        if let urlString = story?.urlString {
            let webController = TOWebViewController(URLString: urlString)

            let navController = UINavigationController(rootViewController: webController)

            self.navigationController?.presentViewController(navController, animated: true, completion: nil)
        }
}
This method informs us when the user clicks a cell, so that we can grab the story based on the index path. With the story, we create an instance of TOWebViewController, passing in the story’s url string. We then wrap the web view controller in its own UINavigationController and present it.
The final customization is to configure the collection view to have different number of columns based on the orientation. This allows us to really showcase the ease of use UICollectionView offers for grid layouts.
To configure the layout, we need to implement a method from UICollectionViewFlowLayoutDelegate:
func collectionView(collectionView: UICollectionView, layout collectionViewLayout: UICollectionViewLayout, sizeForItemAtIndexPath indexPath: NSIndexPath) -> CGSize {
        let height: CGFloat = 250.0

        if UIApplication.sharedApplication().statusBarOrientation == UIInterfaceOrientation.Portrait {
            let columns: CGFloat = UI_USER_INTERFACE_IDIOM() == UIUserInterfaceIdiom.Pad ? 3.0 : 2.0

            let width = CGRectGetWidth(self.view.frame) / columns

            return CGSizeMake(width, height)
        }
        else {
            let columns: CGFloat = UI_USER_INTERFACE_IDIOM() == UIUserInterfaceIdiom.Pad ? 4.0 : 3.0

            let width = CGRectGetWidth(self.view.frame) / columns

            return CGSizeMake(width, height)
        }
}
This method implementation checks if the orientation is Portrait or Landscape and if the app is running on an iPhone or iPad. Based on the configuration it adjusts the cell width so that they get draw in a given set of columns.
For example on an iPhone in landscape, the column count would be 3.
Now your app is ready to go, simply run the app and click the refresh button to see your stories appear!
About the content
This content has been published here with the express permission of the author.


