Getting Started With Kotlin and Anko on Android
I’m just going to say it like it is …
Android is stuck in Java 6 purgatory.

When I first started developing for Android, I was coming out of working very heavily with C# for a few years. I came over to find a lack of proper generics support (when compared to Java generics), no lambda expressions, and an awkward syntax for common things that I felt should just be in the language. 8 years later, I’m still stuck writing super-verbose Java 6. Java 8 has been out for a while now, and it would be great to use some of those features without having to resort to bytecode weaving! (That said, I am very thankful for retrolambda.) Unfortunately, who knows if or when Java 8 support will ever arrive.
Thankfully, there seems to be a new hope for Android development: Kotlin.
![]()
Kotlin is a new JVM-compatible language from JetBrains that you can use to write Android applications. If you haven’t been exposed to the language, I highly recommend that you watch Michael Pardo’s talk on Kotlin from Droidcon NYC. Furthermore, the layout view for a portion of the application will be created with Anko, a DSL (Domain-Specific Language) for Android which is written in Kotlin. You can get a basic understanding of Anko here.
Kotlin, as a language, is a breath of fresh air compared to Java 6. Once you get used to the syntax, you will notice that it is much more succinct than its Java 6 counterpart. Since Kotlin is JVM-compatible, it will compile down to JVM bytecode that is understood by Android.
Important: This article will assume that you have a basic understanding of Kotlin and Anko.
Using Kotlin in an Android project
As with anything new, you’d probably like to try out Kotlin but you don’t want to commit an entire project to it just yet. With Kotlin and Android Studio, you can have both Java and Kotlin sitting side by side in your application. I recommend taking a screen, a feature, or a simple custom widget, and writing it in Kotlin to see how it feels. Integrating Kotlin into your codebase slowly allows you to give the language a test run and allows you to keep existing application code untouched.
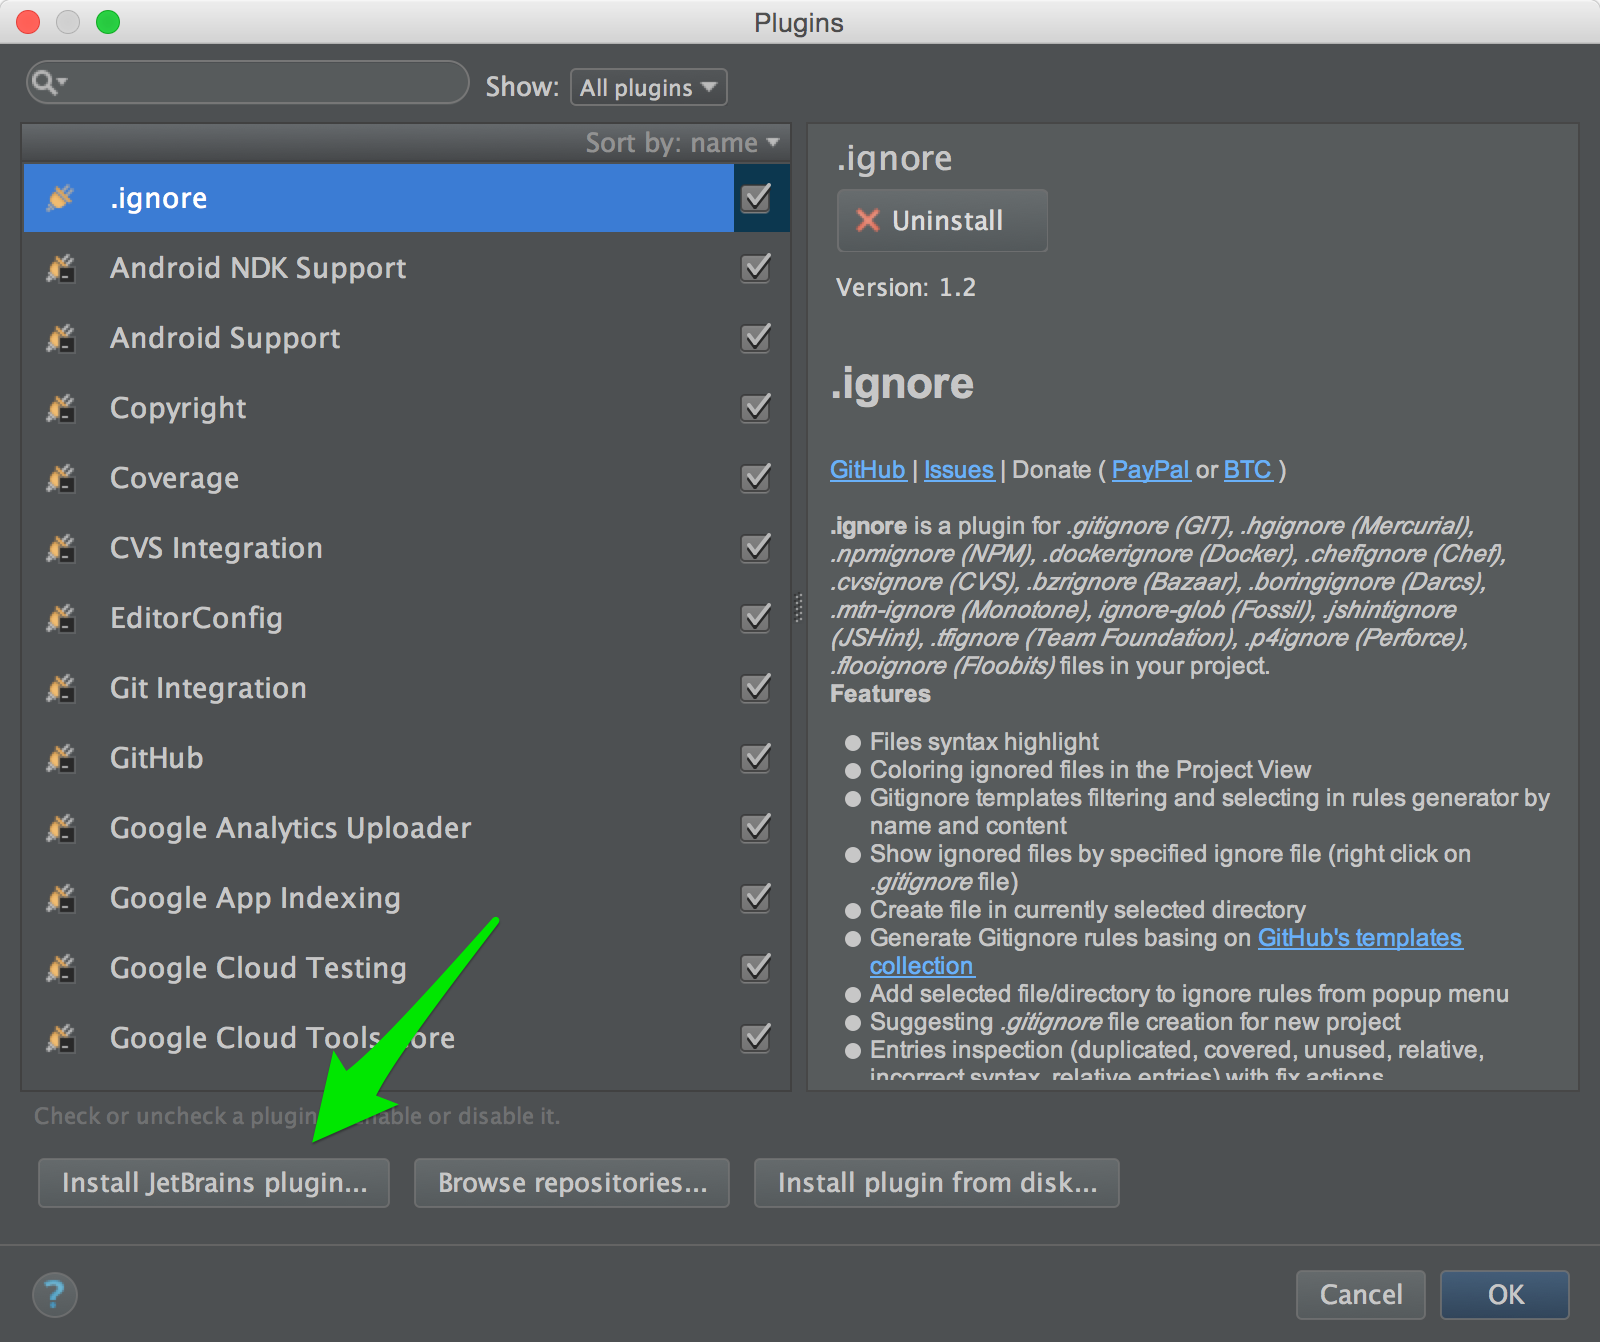
Thankfully it’s quite easily to integrate Kotlin into an existing Android application with the free Kotlin plugin for Android Studio. To get started, you’ll need to install the plugin. Open Android Studio and select Configure > Plugins. If the screen below is not visible, close all your projects and Welcome to Android Studio window will present itself.

Then select Install JetBrains Plugin as shown below.
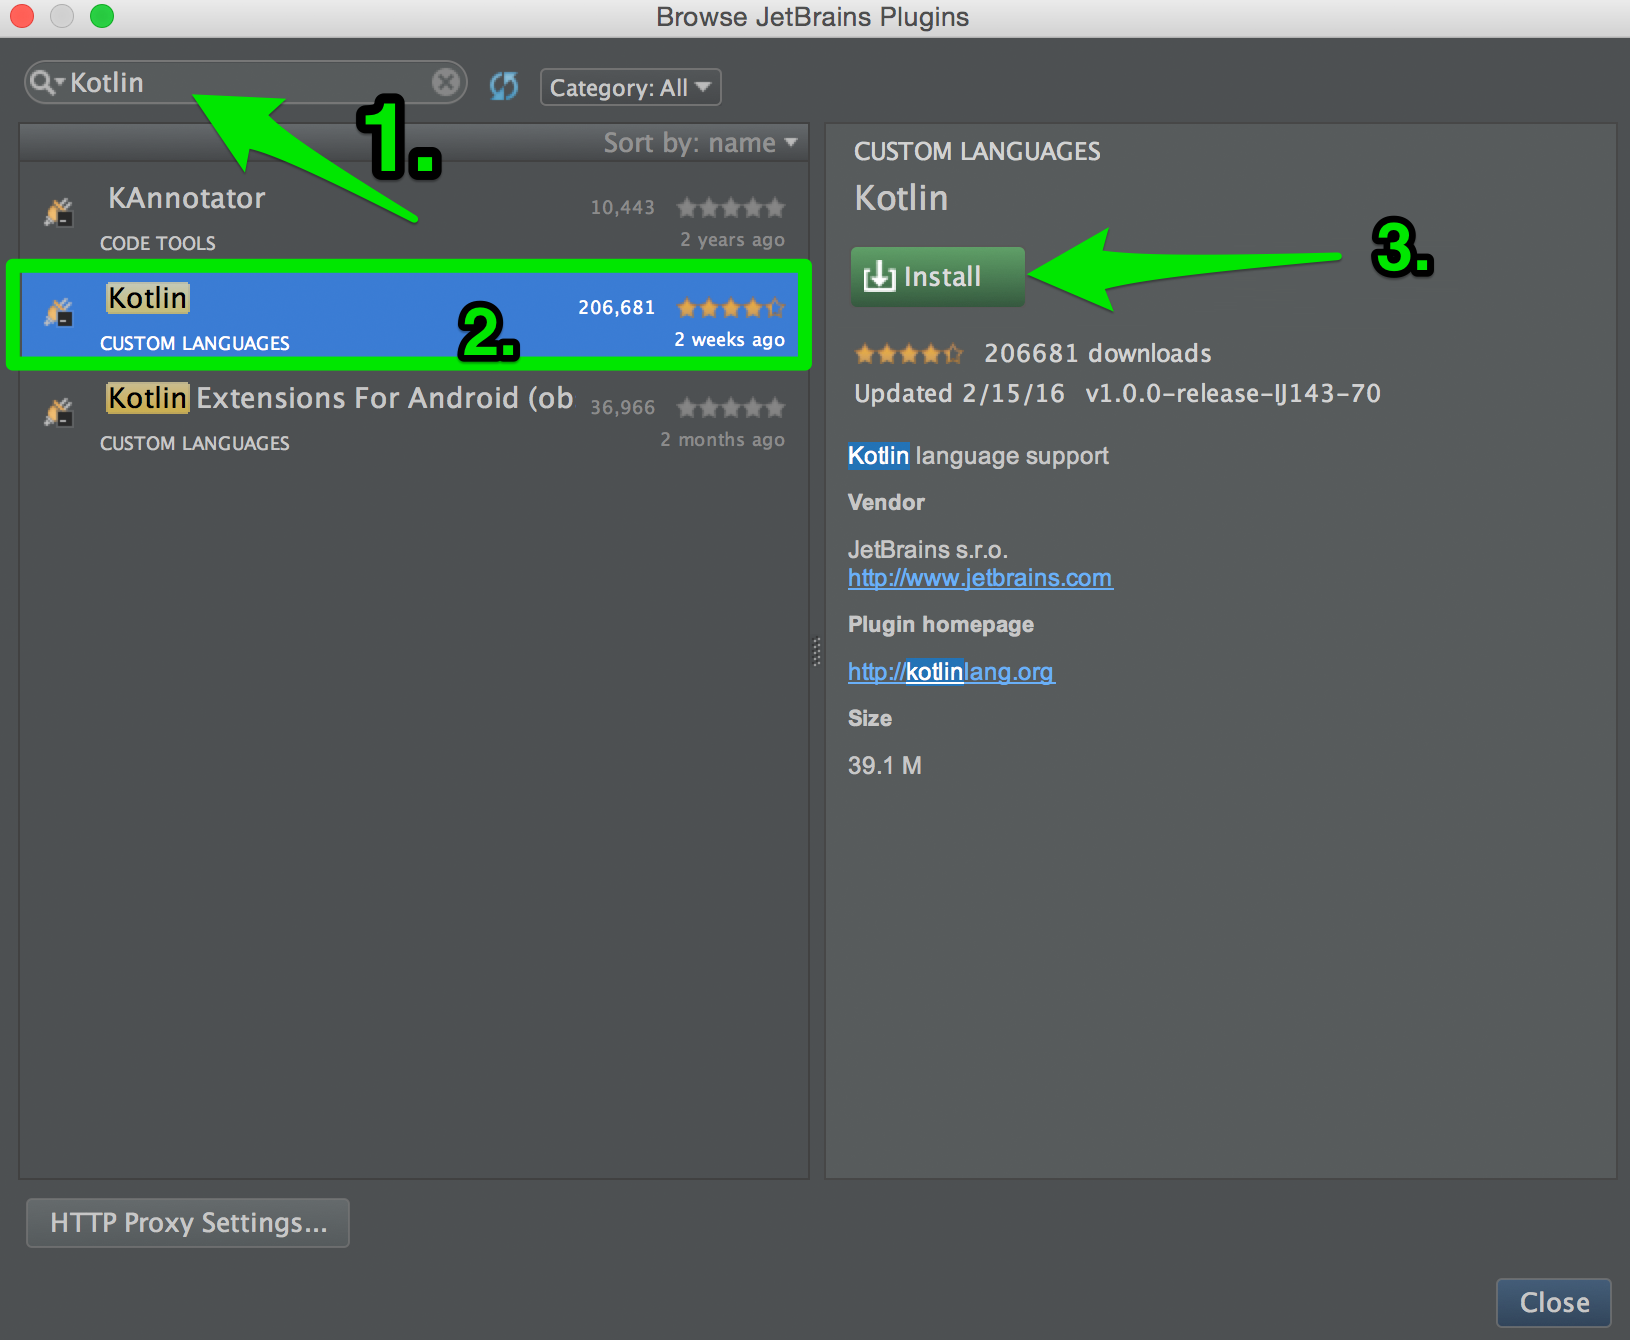
Now search for Kotlin and install the Kotlin plugin as shown below. The main Kotlin plugin includes the Android extensions.
You’re now ready to start building your first feature with Kotlin!
The Application
The application that I’m going to be working with is a simple to-do list application. The main screen has a list of to-dos that looks like this:
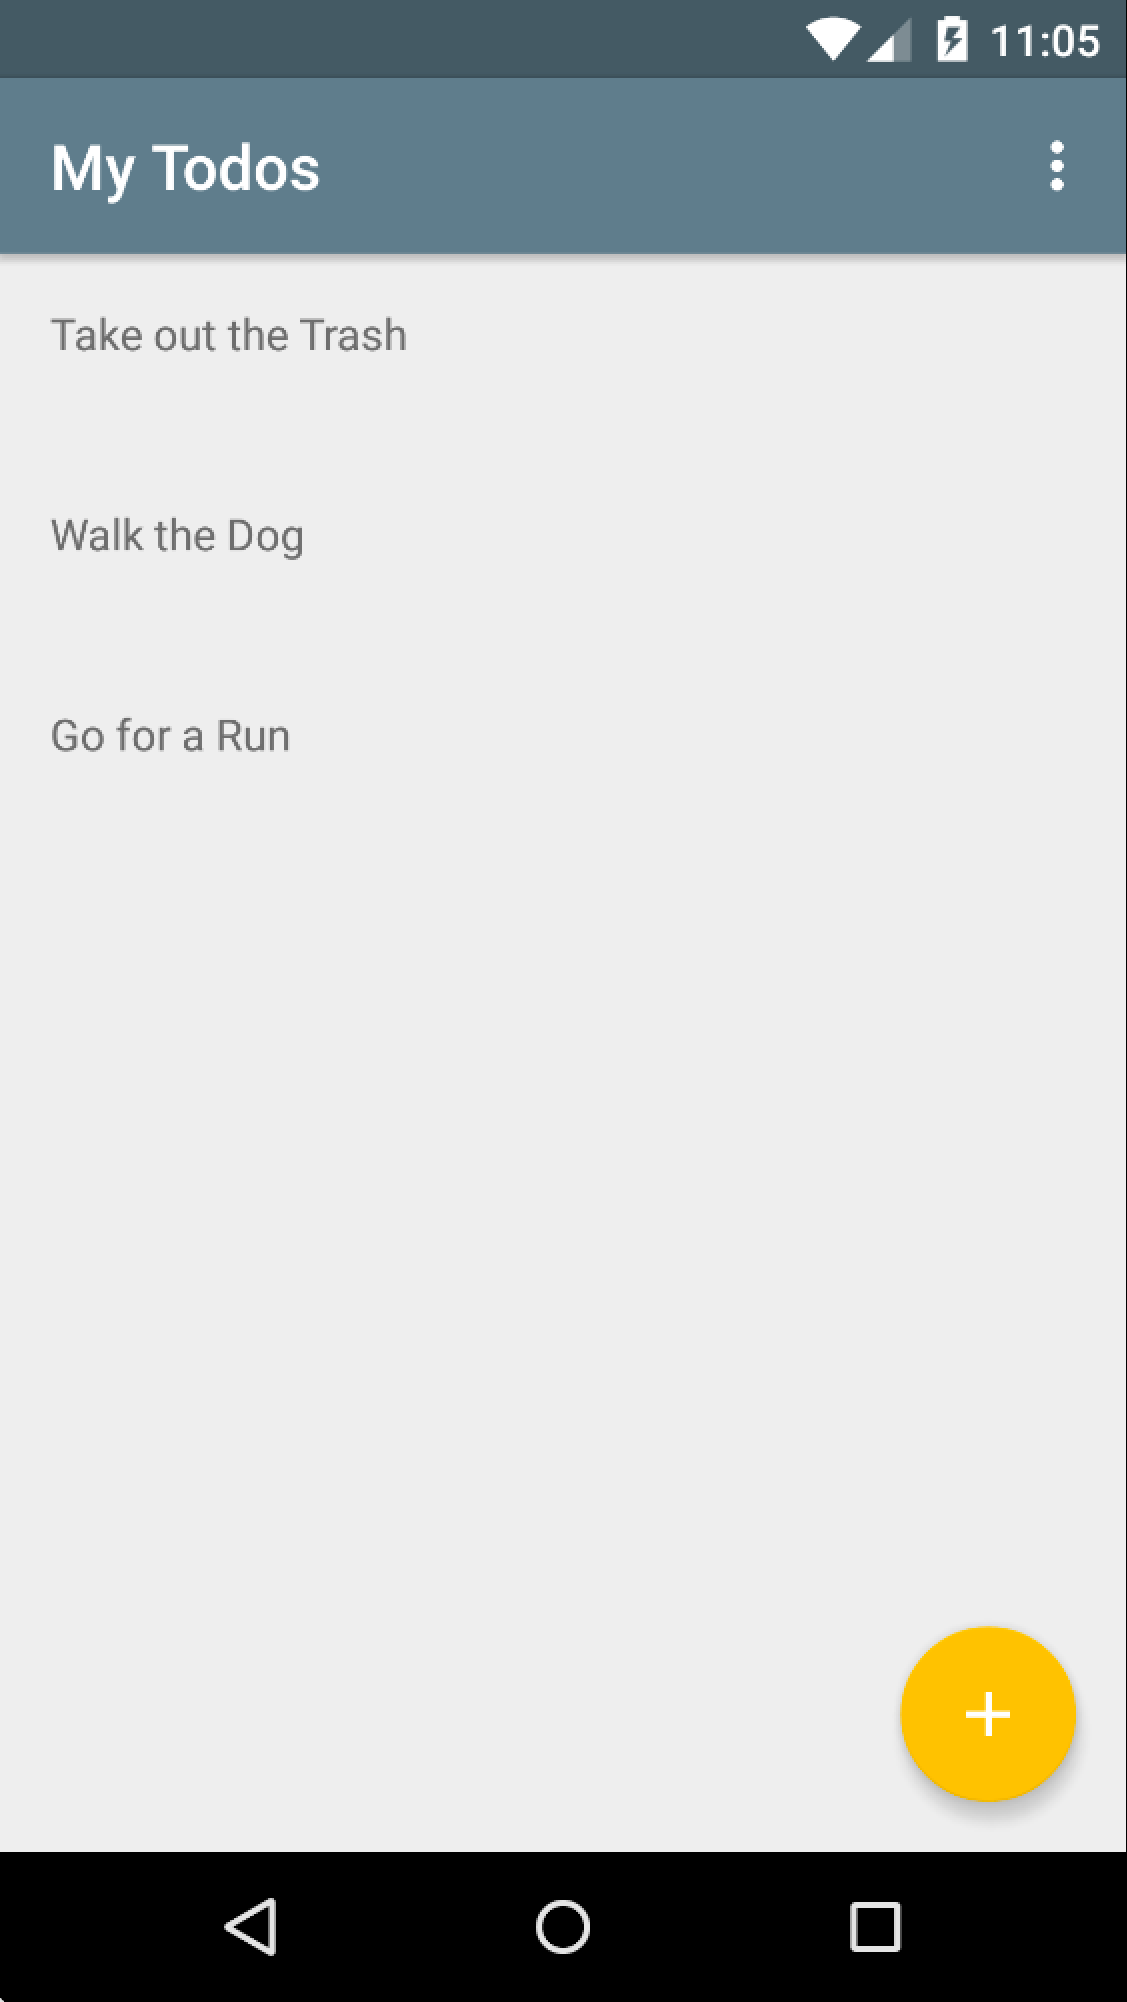
To add a to-do, users tap on the FAB (Floating Action Button). To edit a to-do, they tap on the to-do itself. This will load the add/edit screen. The add/edit screen is what I will write in Kotlin and Anko.
What is Anko?
Anko is a DSL (Domain-Specific Language) for Android written in Kotlin. Traditionally, Android views are expressed as XML layouts. This XML is usually duplicated in various parts of your application and is not re-used (sometimes it is, with includes). At runtime, the XML is then transformed into the Java representation of the view which wastes CPU and battery. Anko allows you to write this view in Kotlin, in an Activity or Fragment (or even as an AnkoComponent, an external Kotlin file that represents the view).
Here’s an example of a simple XML file that is transformed to Anko.
XML
<LinearLayout
    xmlns:android="http://schemas.android.com/apk/res/android"
    android:layout_height="match_parent"
    android:layout_width="match_parent">

    <EditText
        android:id="@+id/todo_title"
        android:layout_width="match_parent"
        android:layout_heigh="wrap_content"
        android:hint="@string/title_hint" />

    <!-- Cannot directly add an inline click listener as onClick delegates implementation to the activity -->
    <Button
        android:layout_width="match_parent"
        android:layout_height="wrap_content"
        android:text="@string/add_todo" />

</LinearLayout>
The same view expressed in Anko
verticalLayout {
    var title = editText {
        id = R.id.todo_title
        hintResource = R.string.title_hint
    }
    button {
        textResource = R.string.add_todo
        onClick { view -> {
                // do something here
                title.text = "Foo"
            }
        }
    }
}
Notice the inline click listener in the layout definition above. Since this is Kotlin, you can also access other view members, such as title and use them in the click listener.
Getting Started
Using this starter app you can start with a blank slate. (Final code is available here). This app has the following:
- An Activity (
MainActivity) that acts as a simple controller of the application. - A RecyclerView to show the to-dos on the first screen (TodosFragment)
- A Realm database to store the to-dos
- A
Todo.javaRealm model - An adapter for the RecyclerView
You will now build the add/edit screen using Kotlin and Anko.
Set Up Your Application for Kotlin and Anko
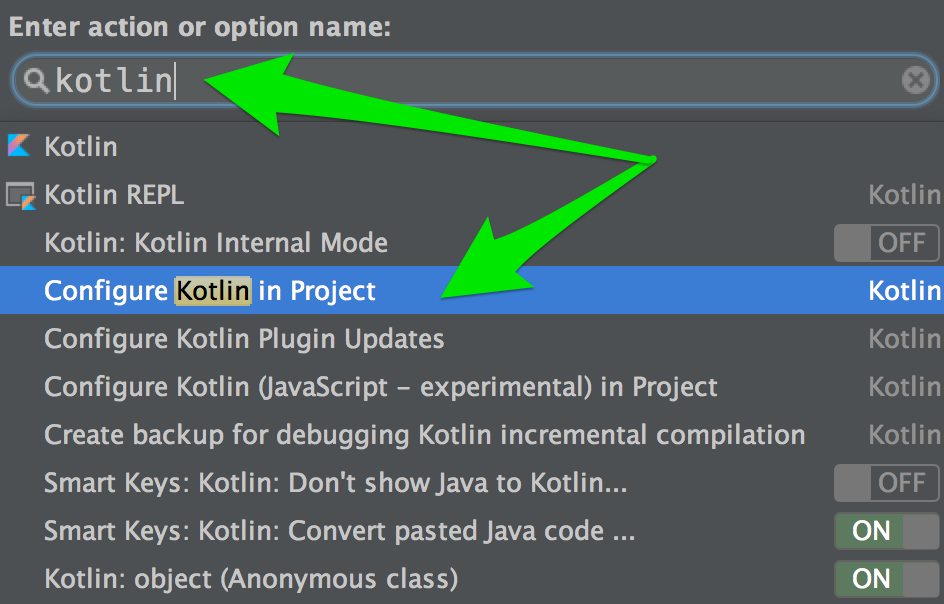
Now that you have the Kotlin extension installed, you’ll want to configure your application using the Configure Kotlin in Project action. In Android Studio, press CMD+SHIFT+A to open the action finder window. Type in Kotlin and select Configure Kotlin in Project action as shown below:
After this runs, your build.gradle file will have been updated with kotlin-android applied at the top of the file, a Kotlin sourceSet added, and Kotlin added to your dependencies.
During this time you’ll also want to add Anko to your dependencies. Your build.gradle file should look similar to this:
apply plugin: 'com.android.application'
apply plugin: 'kotlin-android'

android {
    compileSdkVersion 23
    buildToolsVersion "23.0.2"

    defaultConfig {
        applicationId "com.donnfelker.kotlinmix"
        minSdkVersion 16
        targetSdkVersion 23
        versionCode 1
        versionName "1.0"
    }
    buildTypes {
        release {
            minifyEnabled false
        }
    }
    packagingOptions {
        exclude 'META-INF/services/javax.annotation.processing.Processor'
    }
    sourceSets {
        main.java.srcDirs += 'src/main/kotlin'
    }
}

dependencies {
    compile fileTree(dir: 'libs', include: ['*.jar'])
    testCompile 'junit:junit:4.12'

    // Kotlin
    compile "org.jetbrains.kotlin:kotlin-stdlib:$kotlin_version"

    // Anko
    compile 'org.jetbrains.anko:anko-sdk15:0.8.2' // sdk19, sdk21, sdk23 are also available
    compile 'org.jetbrains.anko:anko-support-v4:0.8.2' // In case you need support-v4 bindings
    compile 'org.jetbrains.anko:anko-appcompat-v7:0.8.2' // For appcompat-v7 bindings

    compile 'com.android.support:appcompat-v7:23.1.1'
    compile 'com.android.support:design:23.1.1'
    compile 'io.realm:realm-android:0.87.1'
    compile 'com.github.thorbenprimke:realm-recyclerview:0.9.12'
    compile 'com.jakewharton:butterknife:7.0.1'
    compile 'com.android.support:support-v4:23.1.1'
}
buildscript {
    ext.kotlin_version = '1.0.0'
    repositories {
        mavenCentral()
    }
    dependencies {
        classpath "org.jetbrains.kotlin:kotlin-gradle-plugin:$kotlin_version"
    }
}
repositories {
    mavenCentral()
}
You’re now ready to start creating the add/edit to-do screen.
Adding a Fragment with Kotlin
If the src/main/kotlin/com.donnfelker.kotlinmix/ directory does not exist, create it. You’ll notice that the kotlin folder turns blue indicating that this is a source folder.
Right-click on the /src/main/kotlin/com.donnfelker.kotlinmix/ folder, select New > Kotlin File/Class, and give it the name EditFragment. The new file is created and only contains a package declaration.
Copy the code below and past it into the EditFragment file.
package com.donnfelker.kotlinmix

import android.os.Bundle
import android.support.v4.app.Fragment
import android.view.LayoutInflater
import android.view.View
import android.view.ViewGroup
import android.widget.Button
import android.widget.EditText
import com.donnfelker.kotlinmix.models.Todo
import io.realm.Realm
import org.jetbrains.anko.*
import org.jetbrains.anko.support.v4.UI
import org.jetbrains.anko.support.v4.find
import java.util.*

class EditFragment : Fragment() {

    val TODO_ID_KEY: String = "todo_id_key"

    val realm: Realm = Realm.getDefaultInstance()

    var todo: Todo? = null

    companion object {
        fun newInstance(id: String): EditFragment {
            var args: Bundle = Bundle()
            args.putString("todo_id_key", id)
            var editFragment: EditFragment = newInstance()
            editFragment.arguments = args
            return editFragment
        }

        fun newInstance(): EditFragment {
            return EditFragment()
        }
    }

    override fun onActivityCreated(savedInstanceState: Bundle?) {
        super.onActivityCreated(savedInstanceState)

        if(arguments != null && arguments.containsKey(TODO_ID_KEY)) {
            val todoId = arguments.getString(TODO_ID_KEY)
            todo = realm.where(Todo::class.java).equalTo("id", todoId).findFirst()
            val todoTitle = find<EditText>(R.id.todo_title)
            todoTitle.setText(todo?.title)
            val todoDesc = find<EditText>(R.id.todo_desc)
            todoDesc.setText(todo?.description)
            val add = find<Button>(R.id.todo_add)
            add.setText(R.string.save)
        }
    }

    override fun onDestroy() {
        super.onDestroy()
        realm.close()
    }

    /**
     *  A private function to create a TODO item in the database (Realm).
     *
     *  @param title the title edit text.
     *  @param desc the description edit text.
     */
    private fun createTodoFrom(title: EditText, desc: EditText) {
        realm.beginTransaction()

        // Either update the edited object or create a new one.
        var t = todo?: realm.createObject(Todo::class.java)
        t.id = todo?.id?: UUID.randomUUID().toString()
        t.title = title.text.toString()
        t.description = desc.text.toString()
        realm.commitTransaction()

        // Go back to previous activity
        activity.supportFragmentManager.popBackStack();
    }

}
The example above has a few methods: newInstance, onActivityCreated, onDestroy, and createTodoFrom. createTodoFrom accepts two EditText widgets as parameters, which are used to either create a new Todo or to update an existing one, all in a single line of code.
var t = todo?: realm.createObject(Todo::class.java)
This will check to see if the field-level todo value is null. If it is, then it will create a new Todo instance. If it is not null, it will use that local field instance. The field instance is instantiated in the onActivityCreated method near the top of the file.
In onActivityCreated, the arguments of the fragment are checked. If they’re not null, the id of the Todo is pulled from the intent extras and the Todo object is obtained from Realm. The todo field is now instantiated, indicating that the Todo object is being edited. The views are updated with the corresponding values at that point.
Adding the View with Anko
You’ve probably noticed that there is no view present in the Fragment. To add a view, copy and paste this code into the fragment:
override fun onCreateView(inflater: LayoutInflater?, container: ViewGroup?, savedInstanceState: Bundle?): View? {
    return UI {
        verticalLayout {
            padding = dip(30)
            var title = editText {
                id = R.id.todo_title
                hintResource = R.string.title_hint
            }

            var desc = editText {
                id = R.id.todo_desc
                hintResource = R.string.description_hint
            }
            button {
                id = R.id.todo_add
                textResource = R.string.add_todo
                onClick { view -> createTodoFrom(title, desc) }
            }
        }
    }.view
}
This Anko code creates a LinearLayout with a vertical orientation (verticalLayout). Inside of the verticalLayout block, three Android widgets are created - two editText views and one button view. The view attributes are set in line. There is something interesting happening in the widget declaration of the button. The button has a click listener set in the view declaration. The method createTodoFrom is called with the title and desc variables that are declared prior to the button. Finally, the view is returned by calling the view property on the AnkoContext (UI class).
The ids are set with R.id.<id_name>. These ids had to be created manually in a file named ids.xml located in app/src/main/res/values/ids.xml. Create this file if it does not exist. The contents of this file are as follows:
<?xml version="1.0" encoding="utf-8"?>
<resources>
    <item name="todo_title" type="id" />
    <item name="todo_desc" type="id" />
    <item name="todo_add" type="id" />
</resources>
This ids.xml file declares ids that can be used in an Android application for various view ids.
Java and Kotlin Commingling
At this point, the view can now be shown on the screen. The only thing left is to show the Fragment when a user taps on an item.
Open the TodosFragment and add the following code to the onTodoClick method:
EditFragment editFragment = EditFragment.Companion.newInstance(task.getId());
        getActivity().getSupportFragmentManager()
                .beginTransaction()
                .replace(R.id.content_main, editFragment, editFragment.getClass().getSimpleName())
                .addToBackStack(editFragment.getClass().getSimpleName())
                .commit();
The EditFragment is written in pure Kotlin, yet it can be called from Android code as a regular Java object very easily.
Notice the EditFragment.Companion.newInstance call? This is necessary because Kotlin does not have static methods. Therefore, a companion object is necessary to accomplish a similar feat in Kotlin.
Finally, you’ll need to wire up the FAB to start the fragment. In the FAB’s click listener, in the MainActivity, you’ll need to add the following code:
EditFragment editFragment = EditFragment.Companion.newInstance();
getSupportFragmentManager()
    .beginTransaction()
    .replace(R.id.content_main, editFragment, editFragment.getClass().getSimpleName())
    .addToBackStack(editFragment.getClass().getSimpleName())
    .commit();
Build and install the application and tap the FAB. This starts the Kotlin part of the application. Add a to-do and tap Add. Back on the list of to-dos, tap a to-do so you can edit it. The button text in the Kotlin EditFagment will change to ‘save’. Update the to-do and tap save.

Congratulations, you’ve now mixed Java and Kotlin together! 👏
You’ve built a feature with Kotlin while the rest of your application remains functional with typical Java that is used in Android. You can continue on your path of Kotlin development or only bring it in where you find it useful.
You can also continue to use Anko as your view mechanism for Kotlin. If you prefer XML, you can still use XML layouts. For example, you can replace the above onCreateView method called with the following:
override fun onCreateView(inflater: LayoutInflater?, container: ViewGroup?, savedInstanceState: Bundle?): View? {
    return inflater?.inflate(R.layout.your_layout, container, false)
}
This gives you the flexibility to work with Kotlin with or without Anko.
Best of luck on your Kotlin adventures!
Sample Code
About the content
This content has been published here with the express permission of the author.


