Veteran author and trainer Wei-Meng Lee walks us through the process of creating your first Apple Watch application in watchOS 2 in this presentation from GOTO Conference CPH 2015. He discusses how to develop your next killer-app for the Apple Watch, and how the various technologies stack up, wrapping up with a solid look at the possibilities afforded by the WatchKit Framework and how it interacts with iOS apps.
Introduction (0:00)
I’m focused on mobile training, so I do a lot of training for iOS and Android. I’m also into wearables training, like Android Wear and Apple Watch. I actually wrote a book called “Learning WatchKit Programming,” but by the time the book was released, it was already outdated. Apple announced a new version of watchOS in June, (watchOS 2.0), and the first book on the left was based on WatchKit 1.X. It has since been updated to cover watchOS 2.0, and that is going to be available end of 2015. Everything I talk about here can be found in this book.
In this post, I’m going to cover how to get started with Apple Watch development and some cool new features available in the latest version of watchOS, including complications and the WatchKit Connectivity Framework.
All the demos for the concepts I talk about here have been posted on my website, so you can download all the source code, you just need Xcode 7. You don’t need to have an Apple Watch, but if you do you can deploy it also.
Who Wins the Smart Watch Race? (3:25)
I always get this question: “Who will be the winner of this race for the wearable?”
My thinking is, whoever controls the smart phone platform controls the smart watch platform. It’s quite obvious, because the smart watch is still very much dependent on your mobile phone. Whatever mobile phone you have, chances are that you will buy the watch coming from the same platform.
The iOS platform is number one in terms of market penetration, followed Android Wear, which is supported by Android. You also have Pebble, but Pebble is in a very dangerous position now because they don’t have a platform to support them. In order for a Pebble watch to make any sense, you have to rely on either iPhone or Android. They are at the mercy of either Google or Apple. That being said, I think it is quite obvious in the long run who the winners in the wearable space are.
Apple Watch: More Details (5:48)
To develop on the Apple Watch, you’ll need Xcode 7, and you should already be familiar with iOS development. In terms of language, you can use either the new Swift language, or if you have a very high threshold for pain, you can use Objective-C. (If you’re just starting out in iOS development, my suggestion is that Swift is a good language to get started.)
In terms of specifications, Apple Watch runs on a custom chip from Apple that has many sensors. It has a heart rate sensor on the back of the watch, which you can use to measure your heartbeat, and it has an accelerometer, which allows you to measure whether you are walking enough, exercising enough, or if it is time to stand up. It has WiFi, so if your watch is out of range from your phone, it can connect to well-known WiFi networks, and it can actually connect to the internet and communicate with the web services directly. It also has Bluetooth LE (low energy), but in terms of programmability, Bluetooth LE it is limited to communications between the Watch and the phone. It’s charged wirelessly using a magnetic charger, so a typical charge can last you for about a day.
How do you interact with an Apple Watch? The first is the Digital Crown, the little knob on the side that you can turn to scroll through a list of items or zoom in and out of images. It also acts as a Home button. There is also Force Touch, where you can press hard on the screen to initiate something similar to a right-click on the desktop. It also has a Taptic Engine, which provides haptic feedback, or little vibrations of different kinds. The different types of feedback vibrations allow you to distinguish one notification from another. As of watchOS 2.0, you can programmatically access the Taptic Engine, which means you can add certain kinds of vibrations to your application if you want to.
In terms of sizes, at this moment there are only two sizes: the 38mm and the 42mm. That’s good news, at least for developers! That’s good news because it means no AutoLayout. If you’re done any iOS programming, you know AutoLayout is a pain in the back. One day, Apple may implement AutoLayout on Apple Watch and your nightmare will move from your mobile platform to your watch.
WatchKit App Architecture (11:34)
At this moment, your Apple Watch application is still reliant on your iPhone for connectivity. In the Watch app, you have two components: WatchKit App and WatchKit Extension. So this is the place where you have all your Swift files, your code. In the WatchKit App, you have your storyboard. In WatchKit Extension, you have all your code.
To elaborate, your WatchKit App contains your storyboard, as well as your resources. That is where you place all your UI and your resources, like your image files, HTML files, etc. Your logic, however, is encapsulated in WatchKit Extension. That is where you write your code, be it Swift or Objective-C. In the previous version of watchOS, WatchKit Extension was actually on your iPhone, not on your Apple Watch. This meant that in the first version of Apple Watch, you had this problem: you run an app on the Watch, tap a button, and it has to make a connection to the phone. The phone executes, get the results, and sends it back over to the watch. The major complaint about first generation Apple Watch is that the performance was really sluggish. In 2.0, they moved WatchKit Extension onto the Apple Watch.
Finally, the WatchKit framework basically communicates between the iPhone and Apple Watch using Bluetooth LE.
When it comes to deploying your applications, you deploy your iOS App Bundle as a single unit: You have your iOS app, your WatchKit app, and your WatchKit extension. That means that today, if you want to develop any applications for the Apple Watch, you must first have an iPhone app. The user would have to go the App Store, download their app, install that onto your iPhone. Only then could the watch app be installed onto your Apple Watch.
Types of Apps: What Can We Develop? (15:19)
Watch Apps
First of all, we can develop native apps. In watchOS 2.0, we can access the accelerometer, access the Taptic Engine, play video files, and do voice and text input.
Complications
Complications are basically apps that supply the data to be displayed on the watch faces. More on that in a moment.
Notifications
By default in your Apple Watch app, you don’t have to do anything to support notifications. Whenever your iPhone receives a notification, it will automatically be sent to your Apple Watch if your iPhone is in a sleep state. But if you are using your iPhone when a notification comes in, your notification will go straight to your iPhone. By default, you don’t have to do anything, but if you want to beautify your notification messages, you can also write applications that support notifications.
Glances
Glances are basically information that show the state of your application. Users can actually swipe from the bottom of the screen to see the latest state of your application.
“Hello, World!” Demo on Apple Watch (17:19)
For the benefit of those who are new to Apple Watch development, I ran through a demo through a “Hello, World!” app during my talk at GOTO Copenhagen. You can watch that demo in the video above.
Complications (25:13)
Let’s talk about complications. The name sounds really complicated, but by definition, a complication is basically a function on a timepiece that does more than just tell the time. They can give you information like flight information, a date, or really anything else you want.
Let’s say I want to change the complications displayed on a particular watch face. I basically do a force touch, select “Customize,” and I can change the look and feel of a particular watch face. I can change the color, and if I swipe it to the right, I will be able to change the types of complication data. By default it has sunrise, sunset, weather, the stopwatch, etc. I can also write my own application to pump data into these complications.
I should note that there are some watch faces that do not support complications. The ones that do not support complications are: Motion, X-Large, Timelapse, Astronomy, Photo Album, Photo, and Solar.
Why might complications be important to you as a developer? Think about the types of data that you want to display on the user’s watch face.
Time Travel (28:25)
Time Travel is a new feature in watchOS 2.0 that allows your application to display time-sensitive information on watch faces with complications. Turning the Digital Crown back and forth displays events in the past and future. A great example of the Time Travel feature is weather forecasts. If you have a complication that displays the current weather, you can turn the Digital Crown and display the weather forecast four hours from now. Or, you can turn it back the other direction and display what the weather was like four hours ago (although most of the time you are probably not interested in that). If only there were a way to display future stock prices!
The interesting thing about Time Travel to a developer is that you can write applications to support it.
As with complications, there are some watch faces that are not compatible with Time Travel. These are: Motion, X-Large, Timelapse, Photo Album, and Photo.
Supporting Complications In Your App (31:35)
In order to start making use of complication, you have to use this framework known as the ClockKit Framework. You simply need to implement the CLKComplicationDataSource protocol. For anyone familiar with the iOS development, it’s the usual protocol delegate design pattern. You just need to acquaint yourself with this protocol and implement its methods.
So you implement the following methods:
getSupportedTimeTravelDirectionsForComplication:withHandler: |
Time travel directions |
getTimelineStartDateForComplication:withHandler: |
Earliest date for complication data |
getTimelineEndDateForComplication:withHandler: |
Latest date for complication data |
getPrivacyBehaviorForComplication:withHandler: |
Privacy behavior - show or hide data when watch is locked |
getCurrentTimelineEntryForComplication:withHandler: |
Current data to display |
getTimelineEntriesForComplication:beforeDate:limit:withHandler: |
Data to display for past timeline |
getTimelineEntriesForComplication:afterDate:limit:withHandler: |
Data to display for future timeline |
getNextRequestedUpdateDate:withHandler: |
Next update time for timeline data |
getPlaceholderTemplateForComplication:withHandler: |
Static display for complication |
Placement for Complications (33:23)
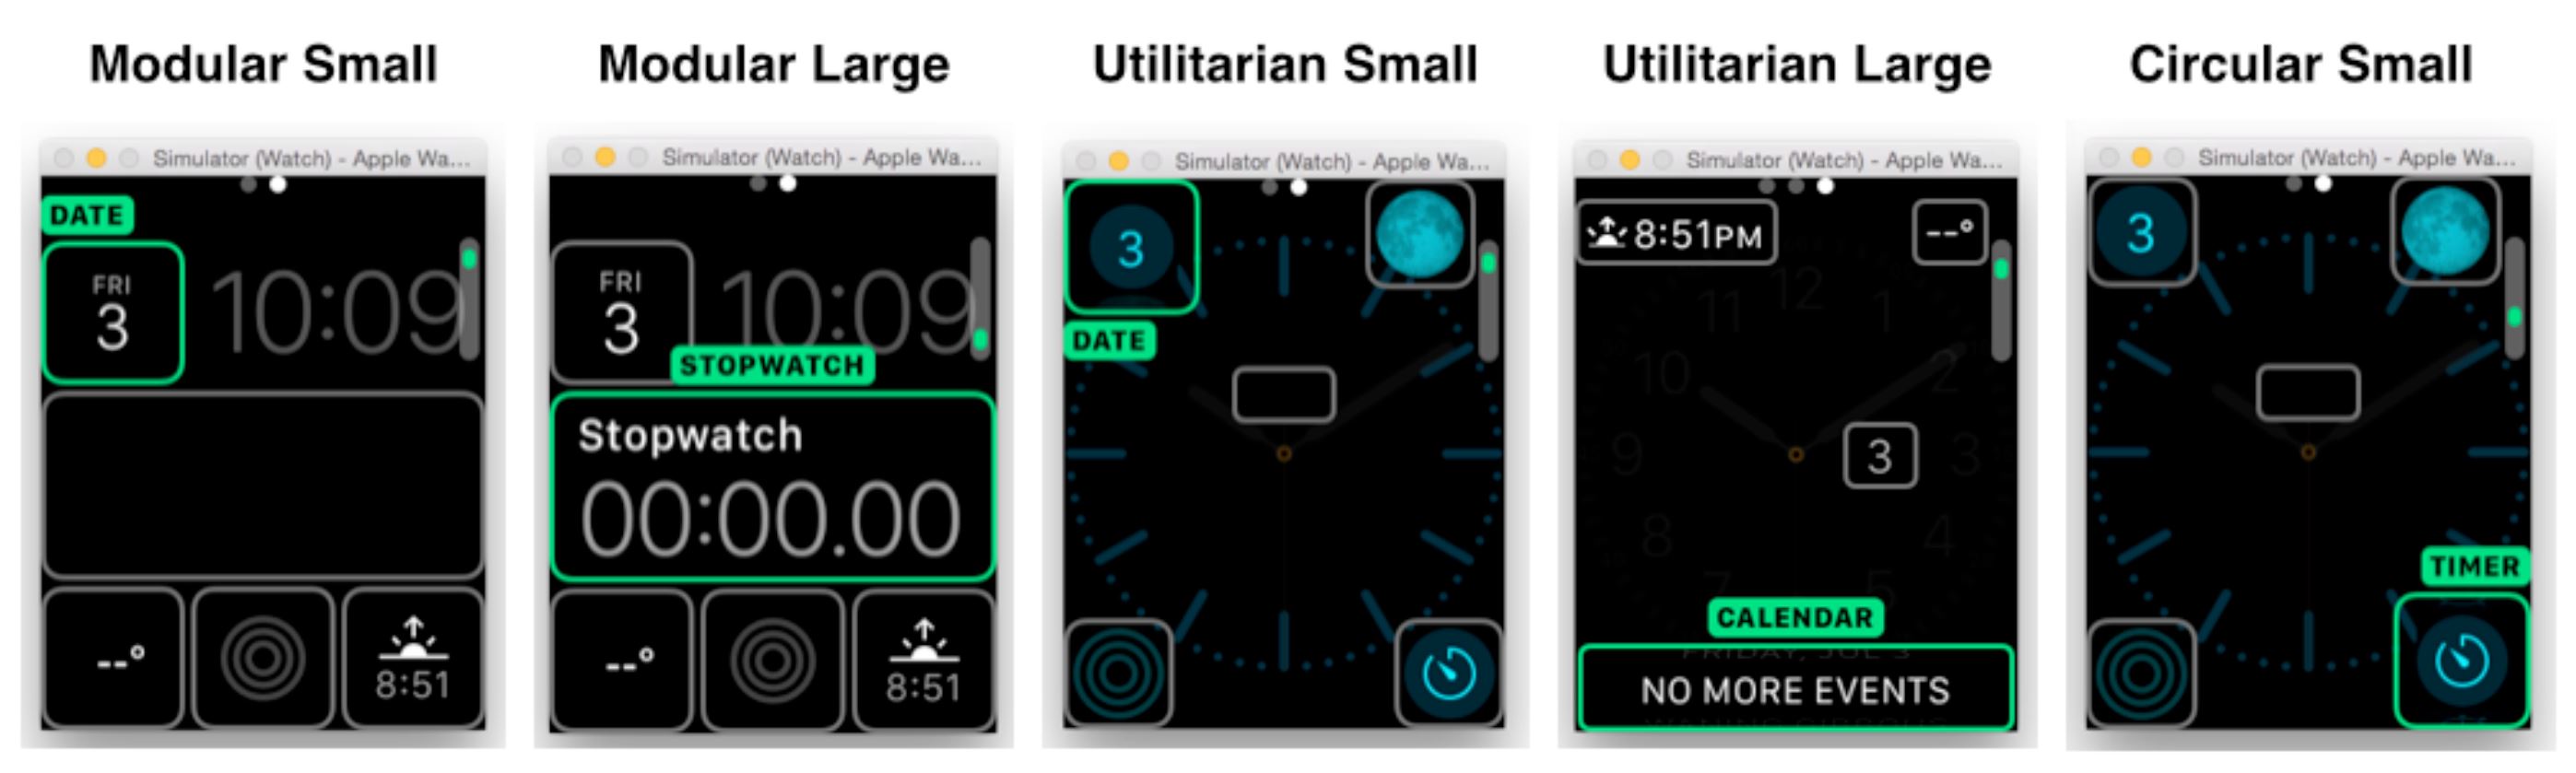
These are the places where you can actually place your complication data. In the current version, Apple supports five main types of complications placement.
The different placements here basically mean that you can display different types of data. For example, you can display a ring if you want, or you can display two rows of text.
As for templates, these are the various templates that you can use to display your complication data on different parts of the watch face:
CLKComplicationTemplateModularSmallColumnsText
CLKComplicationTemplateModularSmallRingImage
CLKComplicationTemplateModularSmallRingText
CLKComplicationTemplateModularSmallSimpleImage
CLKComplicationTemplateModularSmallSimpleText
CLKComplicationTemplateModularSmallStackImage
CLKComplicationTemplateModularSmallStackText

CLKComplicationTemplateModularLargeColumns
CLKComplicationTemplateModularLargeStandardBody
CLKComplicationTemplateModularLargeTable
CLKComplicationTemplateModularLargeTallBody

CLKComplicationTemplateCircularSmallRingImage
CLKComplicationTemplateCircularSmallRingText
CLKComplicationTemplateCircularSmallSimpleImage
CLKComplicationTemplateCircularSmallSimpleText
CLKComplicationTemplateCircularSmallStackImage
CLKComplicationTemplateCircularSmallStackText

CLKComplicationTemplateUtilitarianSmallFlat
CLKComplicationTemplateUtilitarianSmallRingImage
CLKComplicationTemplateUtilitarianSmallRingText
CLKComplicationTemplateUtilitarianSmallSquare

CLKComplicationTemplateUtilitarianLargeFlat
For example, if you select ComplicationTemplateModularSmallColumnsText, you get a 2x2 table in which you can display your data in two rows and two columns. Inside this particular placement template, you have four text fields for you to display your data.
Alternatively, you can select another template, for example ModularSmallRingImage, where you can display an image and a ring. The ring can either be closed-style or open-style. For example, if you want to display a rating, you could use an closed-style ring where a full circle is 1.0, representing a 10/10 but a three-quarter ring is 0.75, or a 7.5/10.
Complications Demo (35:33)
I have another demo above that I gave at GOTO, in which I show how I can populate a complication with movie showtimes and ratings that I pull from my app. Take a look!
Here is the data I use for the demo:
let movies = [
    Movie(movieName: "Terminator 2: Judgment Day",
        runningTime: 137 * MINUTE,
        runningDate: NSDate(timeIntervalSinceNow: -360 * MINUTE),
        rating:8),
    Movie(movieName: "World War Z",
        runningTime: 116 * MINUTE,
        runningDate: NSDate(timeIntervalSinceNow: -120 * MINUTE),
        rating:7),
    Movie(movieName: "Secondhand Lions",
        runningTime: 90 * MINUTE,
        runningDate: NSDate(timeIntervalSinceNow: 10 * MINUTE),
        rating:8),
    Movie(movieName: "The Dark Knight",
        runningTime: 152 * MINUTE,
        runningDate: NSDate(timeIntervalSinceNow: 120 * MINUTE),
        rating:9),
    Movie(movieName: "The Prestige",
        runningTime: 130 * MINUTE,
        runningDate: NSDate(timeIntervalSinceNow: 360 * MINUTE),
        rating:8),
]
Communicating Between the iOS App and the Watch App (40:13)
If you’ll remember, your iPhone application is on the iPhone and your Apple Watch application is on the Apple Watch. However, a lot of times you want to communicate with your Apple Watch.
You make use of the Watch Connectivity Framework. This supports two types of communication: background communication and live communication. For background transfers, you have three different modes: application context, user info, and file transfer. For interactive messaging, you have send message.
Background Transfers - Application Context (41:32)
Background Transfer has this mode known as Application Context. Let’s imagine that I’m trying to send three dictionaries: A, B, and C. Since this is a background transfer, the Apple Watch application need not be running when I send the first dictionary. With the application not running, it will buffer dictionary A. Then, at the same time, I send B. When I send B, B will override A since A is still waiting. If I send C, C will come and override B. In this case, your Apple Watch will always receive the most recent dictionaries sent by your iPhone. This what we call Application Context.
Use Case
This is useful for updating your application state. For example, you are writing a weather application and you want to display the latest whether onto the glances. In this case, the user is only interested in the most recent weather information. So in this case you can use the Application Context method.
Background Transfers - User Info (43:10)
When I send A, B, and C from iPhone to Apple Watch, A, B, C will all be queued up, so it will not collapse. When the Apple Watch application comes to the foreground, it will receive the data in the order that it was sent from the iPhone.
Use Case
This is useful for games, where changes on one device must be synchronized on the other device. You cannot afford to lose a single piece of information.
Background Transfers - File Transfer (43:52)
This is when you want to transfer data other than dictionaries, such as images. You send your image together with an optional dictionary. It is queued up and buffered, and when the application comes to the foreground, it is pushed to the application.
Use Case
This is useful when you want to send images between devices.
Interactive Communications (44:44)
Imagine my iPhone wants to send a message to my Apple Watch, and at the same time, I want a reply from the Apple Watch. Likewise, on the Apple Watch, I can also send a request to the iPhone, get the iPhone to process it, return me the data that I want, and pass it back to me. This mode is more exciting.
These are the two scenarios that can happen: When the Apple Watch sends a message to the iPhone, and if your iPhone app is in the background, or it is not even executing, it will automatically execute your iPhone app in the background. You can actually do a lot of interesting things like home automation like this. However, when the reverse happens, if the iPhone sends a message to the Watch, but the Watch app is not running, the communication will fail. So in this case, you see that the Apple Watch has higher priority.
Use Case
For example, you can use your Watch and say, “Hey, Siri,” then, “Launch my app.” When your app launches, it will be in the foreground. You touch a button and lock your garage door, for instance. The command would be sent to the Watch through your phone, and your phone would connect to your home automation network and unlock your garage door.
Cross-Device Communication Demo (47:13)
I demonstrated using the WatchKit Connectivity Framework, so make sure to check it out in the video above.
Final Suggestions to Develop Killer Watch Apps (50:44)
Don’t cram your existing apps onto the watch!
I know you have a lot of mobile apps, but don’t cram all the UI from the mobile apps onto the watch. That’s not going to work.
Think of the watch as an extension of your phone
Use the watch to enhance the experience of your mobile app
Home automation
This is a great candidate for your Apple Watch. Things like unlocking the garage door are done very easily using Siri: you can press the button, talk to your phone, and your phone activates your home automation project.
About the content
This talk was delivered live in October 2015 at goto; Copenhagen. The video was transcribed by Realm and is published here with the permission of the conference organizers.


