

This talk will explore how the structure and properties of the Swift Language make writing UI code simpler. We will take a look at common pitfalls while building the UI layer and examine a Swifty way to improve upon it. The talk will examine modeling view state with enums, useful third-party Swift libraries, unifying views via protocols, and more!
Introduction
I’m Sommer Panage, and I am currently the lead iOS engineer at a small start-up in San Francisco called Chorus Fitness. When working on the production app at Chorus Fitness, I was able to come up with my own app architecture and patterns. In the process, I noticed patterns arising where I was writing the same code.
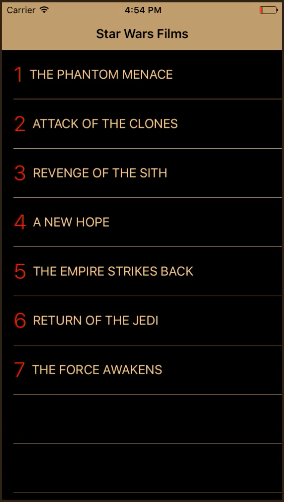
Today, I’d like to tell you four stories about those patterns, and how I discovered fun ways to improve upon them using the features of the Swift language itself. I will explain it through a sample app that shows the famous yellow text of Star Wars by crawling Start Wars API as below.

Schrodinger’s Result
I’d like to call this first story Schrodinger’s Result.
Getting data from the backend:
	func getFilms(completion: @escaping ([Film]?, APIError? -> Void) {
		let url = SWAPI.baseURL.appendingPathComponent(Endpoint.films.rawValue)
		let task = self.session.dataTask(with: url) { (data, response, error) in
			if let data = data {
				do {
					let jsonObject = try JSONSerialization.jsonObject(with: data, options: [])
					if let films = SWAPI.decodeFilms(jsonObject: jsonObject) {
					completion(films, nil)
					} else {
					completion(nil, .decoding)
					}
				} catch {
				completion(nil, .server(originalError: error))
				}
			} else {
			completion(nil, .server(originalError: error))
			}
		}
		task.resume()
	}
Here, if the data returns then I send it back in my completion block, otherwise, If I don’t get the data of it’s improper, I call the completion block with nil for my data and an error.
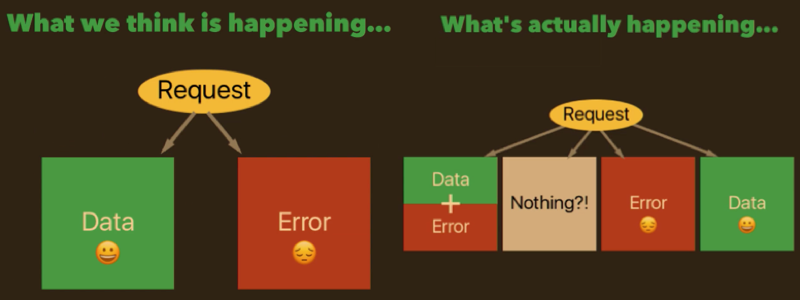
I either get a result from my server, or there’s some kind of an error. But If we look at the UI code below, that’s not the case. We see there are four possible outcomes here, two of which don’t make sense.
	override func viewDidLoad() {
		super.viewDidLoad()

		apiClient.getFilms() { films, error in
			if let films = films{
				//Show film UI
				if let error = error {
					//Log warning ... this is weird
				}
			} else if let error = error {
				// Show error UI
			} else {
				// No results at all? Show error UI I guess?
			}
		}
	}
The solution is to model our server interaction differently: either a success/result object, or a failure/error object.
Using a framework by Rob Rix, called Result, is how I like to implement such a solution for this scenario. It’s simple and captures exactly what we’re trying to do.
	public enum Result<T, Error: Swift.Error>: ResultProtocol {
		case success(T)
		case failure(Error)
	}
A note about enums and associated values
There are two possible enum cases: success or failure. For success, we have a non-optional result object of type T. That’s whatever our data is going to be. For failure we have a non-optional error object. There are now only two cases to deal with.
	func getFilms(completion: @escaping ([Film]?, APIError? -> Void) {
		let task = self.session
			.dataTask(with: SWAPI.baseURL.appendingPathComponent(Endpoint.films.rawValue)) { (data, response, error) in
				let result = Result(data, failWith: APIError.server(originalError: error!))
					flatMap { data in
						Result<Any, AnyError>(attempt: { try JSONSerialization.jsonObject(with: data, options: []) })
							.mapError { _ in APIError.decoding }
					}
					.flatMap { Result(SWAPI.decodeFilms(jsonObject: $0), failWith: .decoding) }

				completion(result)
			}
		}
		task.resume()
	}
As reflected in the UI code:
	override func viewDidLoad() {
		super.viewDidLoad()

		apiClient.getFilms() { result in
			switch result {
			case .success(let films): print(films) // Show my UI!
			case .failure(let error): print(error) // Show some error UI!
			}
		}
	}
Using the result enum allowed us to model success and failure from our server interaction more correctly, and this allowed us to simplify our view controller code.
The Little Layout Engine that Could
Storyboards
I generally don’t use storyboards in my production apps. Firstly, working with storyboards on teams is much harder in my experience. Changes are not always obvious when viewing the XML diff and even worse, when there’s a merge conflict, resolving them can be a pain.
When working with UI, you’re often repeating the same colors and fonts and margins. Those values should all be decomposed as constants, and in storyboards, there is no built in support for it.
The connections between our interface builder files and our outlets in our code are not enforced at compile time. If I draw a connection between my button and my tap button method, then rename that method, the project will still build but I’m going to crash at runtime.
Programmatic Auto Layout
If I’m not using storyboards, I’m using Programmatic Auto Layout. In my app, the main view is a table view, and that table view is the same size as it’s parent.
I can use iOS 9’s layout anchors to set up that layout.
To make the layout code far more readable and far simpler to write, I like to use another framework called Cartography by Robb Bohnke.
Using Cartography you can set up your Auto Layout constraints in beautifully declarative code.
	init() {
		super.init(frame: .zero)

		addSubview(tableView)

		// Autolayout: Table same size as parent
		constrain(tableView, self) { table, parent in
			table.edges == parent.edges
		}
	}
Below is a more complex example of a layout with written with Cartography. Essentially, we’re expressing our Auto Layout as a set of linear equations.
	private let margin: CGFloat = 16
	private let episodeLeftPadding: CGFloat = 8

	override init(style: UITableViewCellStyle, reuseIdentifier: String?) {
		super.init(style: style, reuseIdentifier: reuseIdentifier)

		contentView.addSubview(episodeLabel)
		contentView.addSubview(titleLabel)

		constrain(episodeLabel, titleLabel, contentView) { episode, title, parent in
			episode.leading == parent.leading + margin
			episode.top == parent.top + margin
			episode.bottom == parent.bottom - margin

			title.leading == episode.trailing + episodeLeftPadding
			title.trailing <= parent.trailing - margin
			title.centerY == episode.centerY
		}
	}
Our episode number has some margin within the content view, the title has some padding, and it’s centered.
Using the Cartography framework harnesses a great feature of Swift operator overloads - and it makes Programmatic Auto Layout a breeze.
View States
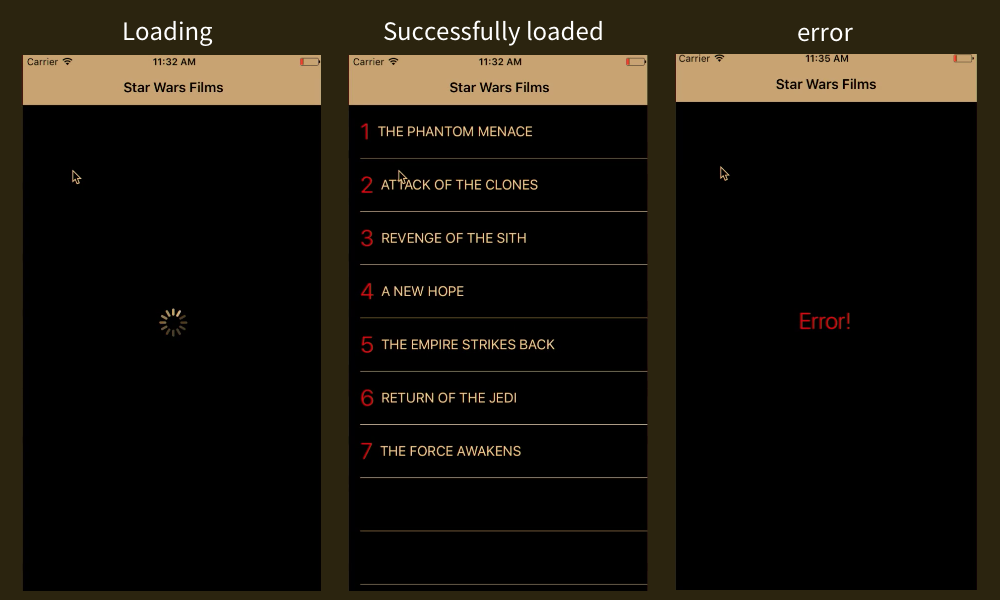
Often we find that our views have their data in at least three states:
- The data is loading
- The data has successfully loaded, or
- If there was some type of an error, then there will be a UI state that expresses that error.
Below, you’ll see how we might first handle our different view states.
	/// MainView.swift

	var isLoading: Bool = false {
		didSet {
			errorView.isHidden = true
			loadingView.isHidden = !isLoading
		}
	}

	var isError: Bool = false {
		didSet {
			errorView.isHidden = !isError
			loadingView.isHidden = true
		}
	}

	var items: [MovieItem]? {
		didSet {
			tableView.reloadData()
		}
	}
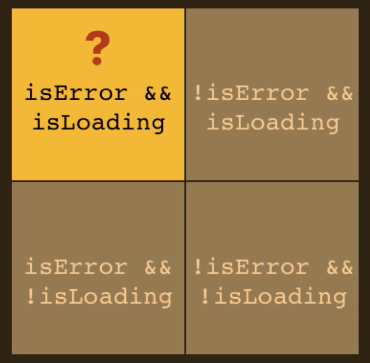
Flags are a common way to handle view states. The flags denote, isLoading or isError. This works but it’s not great.
We are representing more states than we have: If isError and isLoading accidentally gets set to true, we don’t really know what state we’re in. Our view actually has three states, and two of those have some associated information.
The solution to this is an enum with associated values.
	final class MainView: UIView {

		enum State {
			case loading
			case loaded(items: [MovieItem])
			case error(message: String)
		}

		init(state: State) { ... }

		// the rest of my class...
	}
Notice that we can also initialize our view with the exact state we want. From initialization forward, our view is always in exactly one state.
All of our view management happens here and nowhere else in the view. We set our ViewState to loading before we call getFilms, and then we set it either to loaded or error, depending on the result.
Pete and the Repeated Code

Our second view controller, the one that shows the famous yellow text, also seems to have the exact same three view states. This brings us to our fourth and final tale, I call Pete and the Repeated Code.
We have a set of behaviors that we want to be shared by unrelated objects. In this case, our unrelated objects are our main view controller and our crawl view controller. We can use a protocol to simplify things.
A protocol defines a blueprint of methods, properties and other requirements that suit a particular task or piece of functionality. The protocol can be adopted by a class, a struct, or an enum, and it can provide an actual implementation for those requirements.
In this case, we want to represent the behaviors associated with having three view states.
We want to address loading data into a view, in particular, have the data load or fail. In order to do that, our view needs to have a ViewState enum; it needs a loading view, an error view, and when state changes, we need some sort of an update function to call.
protocol DataLoading {
	associatedtype DataLoading

	var state: ViewState<Data> { get set }
	var loadingView: loadingView { get }
	var errorView: ErrorView { get }

	func update()
}

enum ViewState<Content> {
	case loading
	case loaded(data: Content)
	case error(message: String)
}
We’ll put those things all in our protocol - this is the set of behaviors that will define our loading pattern and we can make our ViewState enum generic, and it can load whatever it needs to.
// default protocol implementation
extension DataLoading where Self: UIView {
	func update() {
		switch state {
		case .loading:
			loadingView.isHidden = false
			errorView.isHidden = true
		case .error(let error):
			loadingView.isHidden = true
			errorView.isHidden = false
			Log.error(error)
		case .loaded:
				loadingView.isHidden = true
				errorView.isHidden = true
		}
	}
}
By decomposing functionality that is shared by non-related objects into a protocol, it helps us avoid duplicated code, and consolidate our logic in all one place.
// DataLoading in Main View
final class MainView: UIView, DataLoading {
	let loadingView = LoadingView()
	let errorView = ErrorView()

	var state: ViewState<[MovieItem]> {
		didSet {
			update()
			tableView.reloadData()
		}
	}
}

// DataLoading in Crawl View
class CrawlView: UIView, DataLoading {
	let loadingView = LoadingView()
	let errorView = ErrorView()

	var state: ViewState<String> {
		didSet {
			update()
			crawlLabel.text = state.data
		}
	}
}
About the content
This talk was delivered live in March 2017 at try! Swift Tokyo. The video was recorded, produced, and transcribed by Realm, and is published here with the permission of the conference organizers.


